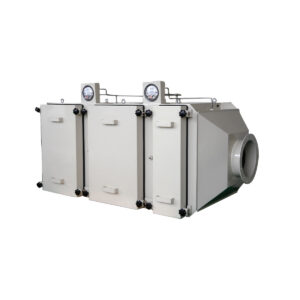
As we step into 2025, the importance of clean air in indoor environments has never been more paramount. With advancements in air purification technology, ceiling-mounted HEPA housing boxes have emerged as a crucial component in maintaining optimal air quality. This comprehensive guide will walk you through the intricacies of installing these vital systems, ensuring you're equipped with the latest knowledge and best practices for creating healthier indoor spaces.
The installation of ceiling-mounted HEPA housing boxes is a task that requires precision, expertise, and a thorough understanding of air filtration principles. From selecting the right location to ensuring proper sealing and integration with existing HVAC systems, each step plays a critical role in the overall effectiveness of your air purification setup. Whether you're a facility manager, a cleanroom designer, or a homeowner looking to upgrade your air quality, this guide will provide you with invaluable insights into the installation process.
As we delve into the world of HEPA filtration systems, we'll explore the latest trends, technologies, and techniques that have shaped the industry in recent years. The landscape of air purification has evolved significantly, with new materials, smart integration capabilities, and enhanced efficiency standards revolutionizing how we approach indoor air quality. By understanding these advancements, you'll be better prepared to make informed decisions about your HEPA housing box installation.
The installation of ceiling-mounted HEPA housing boxes is not just a matter of improving air quality; it's an investment in the health and safety of occupants, the protection of sensitive equipment, and the overall performance of controlled environments.
What are the key considerations before installing a ceiling-mounted HEPA housing box?
Before diving into the installation process, it's crucial to understand the foundational aspects that will influence your ceiling-mounted HEPA housing box setup. The pre-installation phase is where careful planning and assessment can make all the difference in the long-term performance of your air filtration system.
Key considerations include evaluating the room's size, purpose, and existing airflow patterns. You'll need to determine the optimal location for the HEPA housing box, taking into account factors such as ceiling height, structural support, and accessibility for maintenance. Additionally, assessing the room's air change requirements and calculating the necessary filtration capacity are essential steps in ensuring your installation meets the specific needs of your space.
Proper planning and assessment before installation can significantly reduce the risk of performance issues and increase the longevity of your HEPA filtration system.
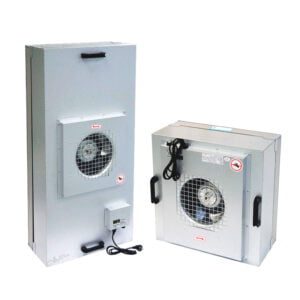
When selecting a HEPA housing box, it's important to consider not just the filtration efficiency but also the compatibility with your existing HVAC system. The YOUTH brand offers a range of HEPA housing boxes designed to integrate seamlessly with various ceiling types and HVAC configurations, ensuring optimal performance and ease of installation.
| Consideration | Description | Impact on Installation |
|---|---|---|
| Room Size | Square footage and volume | Determines number and size of units |
| Ceiling Type | Drop ceiling, solid, or other | Affects mounting method and support |
| Air Changes | Required air changes per hour | Influences filtration capacity needed |
| Accessibility | Ease of reaching unit for maintenance | Determines installation height and location |
In conclusion, thorough preparation and consideration of these key factors will set the stage for a successful installation, ensuring that your ceiling-mounted HEPA housing box performs optimally and provides the clean air quality you're aiming for.
How do you properly measure and mark the ceiling for HEPA housing box installation?
Accurate measurement and marking are the foundation of a successful ceiling-mounted HEPA housing box installation. This critical step ensures that the unit fits perfectly, aligns with existing ductwork, and maintains the aesthetic integrity of your ceiling.
To begin, you'll need to consult the specifications of your chosen HEPA housing box and the layout of your room. Using a laser level and measuring tape, carefully map out the exact location where the unit will be installed. Pay special attention to any obstacles such as light fixtures, sprinkler systems, or existing vents that may interfere with the installation.
Precision in measurement and marking can prevent costly mistakes and ensure the HEPA housing box is positioned for optimal airflow and filtration efficiency.
When marking the ceiling, it's essential to account for the full dimensions of the HEPA housing box, including any additional space required for ductwork connections or maintenance access. The Ceiling-mounted HEPA Housing Box installation process often requires creating a template to ensure accurate cutting of the ceiling material.
| Measurement Aspect | Tool Required | Importance |
|---|---|---|
| Ceiling Grid Layout | Laser Level | Ensures alignment with existing structures |
| Unit Dimensions | Measuring Tape | Determines exact cut size |
| Ductwork Placement | Stud Finder | Avoids interference with ceiling joists |
| Clearance Zones | Template | Ensures space for maintenance access |
In conclusion, taking the time to meticulously measure and mark your ceiling will pay dividends in the smooth installation and optimal performance of your HEPA housing box. This attention to detail sets the stage for the subsequent steps in the installation process.
What tools and equipment are necessary for a successful installation?
Equipping yourself with the right tools and equipment is crucial for a smooth and efficient installation of a ceiling-mounted HEPA housing box. Having everything at hand before you begin will save time and prevent unnecessary interruptions during the process.
The essential toolkit for this job includes both basic hand tools and specialized equipment. You'll need standard items such as a drill, screwdrivers, wrenches, and a utility knife. Additionally, specific tools like a hole saw or reciprocating saw may be required for cutting the ceiling opening. Safety equipment, including gloves, safety glasses, and a dust mask, is non-negotiable to protect yourself during the installation.
Using the correct tools not only facilitates a smoother installation but also ensures the integrity of the HEPA housing box and the surrounding ceiling structure.
It's also important to have a sturdy ladder or scaffolding to safely reach the ceiling. For larger or heavier units, a lifting mechanism or additional manpower may be necessary. Don't forget about cleaning supplies to maintain a dust-free environment during and after the installation.
| Tool Category | Specific Items | Purpose |
|---|---|---|
| Cutting Tools | Hole saw, reciprocating saw | Creating precise ceiling openings |
| Measuring Devices | Laser level, tape measure | Ensuring accurate placement |
| Safety Equipment | Gloves, goggles, dust mask | Personal protection |
| Fastening Tools | Drill, screwdrivers, wrenches | Securing the housing box |
| Access Equipment | Ladder, scaffolding | Reaching the installation area safely |
In conclusion, having a well-prepared toolkit is essential for a successful ceiling-mounted HEPA housing box installation. It not only facilitates the process but also contributes to the safety and quality of the installation.
How do you properly cut and prepare the ceiling opening?
Creating the right opening in your ceiling is a critical step in the installation process of a ceiling-mounted HEPA housing box. This task requires precision and care to ensure a perfect fit and maintain the structural integrity of your ceiling.
Begin by double-checking your measurements and markings. Use the template provided with your HEPA housing box or create one based on the unit's specifications. Carefully cut along the marked lines using the appropriate tool for your ceiling material – typically a hole saw for smaller openings or a reciprocating saw for larger cuts. Take care to make clean, straight cuts to ensure a snug fit for the housing box.
A properly cut and prepared ceiling opening not only ensures a secure fit for the HEPA housing box but also minimizes the risk of air leaks, which could compromise the system's efficiency.
After cutting, inspect the opening for any rough edges or debris. Smooth out any imperfections and reinforce the edges if necessary. This is also the time to check for any wiring, plumbing, or other obstacles that may have been hidden within the ceiling and address them accordingly.
| Ceiling Type | Recommended Cutting Tool | Additional Preparation |
|---|---|---|
| Drywall | Drywall saw or utility knife | Reinforce edges with drywall tape |
| Drop Ceiling | Tin snips or utility knife | Adjust grid if necessary |
| Plaster | Reciprocating saw with plaster blade | Apply edge sealant to prevent crumbling |
| Acoustic Tile | Utility knife or specialized tile cutter | Install additional support if needed |
In conclusion, taking the time to properly cut and prepare your ceiling opening sets the foundation for a secure and efficient installation of your HEPA housing box. This attention to detail will pay off in the long-term performance and aesthetics of your air filtration system.
What are the steps for safely lifting and securing the HEPA housing box?
Lifting and securing the HEPA housing box is a crucial phase of the installation process that requires careful planning and execution. Safety should be your top priority, as these units can be heavy and unwieldy.
Start by assembling a team if the unit is large or heavy. Use appropriate lifting equipment such as a scissor lift or a sturdy ladder with a helper to support the box. Before lifting, ensure that all necessary mounting hardware is readily accessible. Carefully lift the housing box into position, aligning it with the prepared ceiling opening.
Proper lifting techniques and secure mounting are essential not only for the safety of installers but also for the long-term performance and stability of the HEPA housing box.
Once in position, begin securing the housing box according to the manufacturer's instructions. This typically involves using brackets, bolts, or other fastening methods to attach the unit to the ceiling structure. Ensure that the weight is evenly distributed and that the unit is level.
| Step | Action | Safety Consideration |
|---|---|---|
| Preparation | Gather tools and hardware | Ensure all items are within reach |
| Lifting | Use proper equipment and technique | Maintain proper posture, use team lifting |
| Alignment | Position unit correctly in opening | Avoid pinch points and awkward angles |
| Securing | Fasten unit according to instructions | Double-check all connections for stability |
| Leveling | Adjust as necessary | Use a level to ensure proper orientation |
In conclusion, the process of lifting and securing your HEPA housing box requires a combination of careful planning, proper equipment, and attention to detail. By following these steps, you'll ensure a safe installation that provides a solid foundation for your air filtration system.
How do you properly connect the HEPA housing box to existing ductwork?
Connecting your newly installed HEPA housing box to the existing ductwork is a critical step that ensures the efficient operation of your air filtration system. This process requires precision and attention to detail to maintain the integrity of your HVAC system and maximize the performance of your HEPA filter.
Begin by inspecting the existing ductwork for any signs of damage or leaks. Clean the connection points thoroughly to ensure a tight seal. Measure and cut the ductwork to fit precisely between the HEPA housing box and the existing system. Use appropriate adapters or transition pieces if the sizes don't match exactly.
A properly connected HEPA housing box not only ensures optimal airflow but also prevents contamination from unfiltered air, maintaining the cleanliness of your environment.
When making the connections, use high-quality duct sealant or metal tape to create airtight joints. Avoid using standard duct tape, as it can degrade over time and compromise the system's efficiency. For flexible ductwork, use proper clamps to secure the connections.
| Connection Type | Recommended Method | Sealing Technique |
|---|---|---|
| Metal to Metal | Mechanical fasteners | Mastic sealant or metal tape |
| Flexible to Metal | Adjustable clamps | Mastic sealant and zip ties |
| Transition Pieces | Custom fabrication | Silicone caulk and metal tape |
| Damper Installation | In-line or at housing box | Ensure accessible for adjustment |
In conclusion, connecting your HEPA housing box to existing ductwork requires careful planning and execution. By ensuring proper connections and sealing, you'll maximize the efficiency of your air filtration system and maintain the desired air quality in your space.
What are the best practices for sealing and insulating the HEPA housing box installation?
Proper sealing and insulation of your ceiling-mounted HEPA housing box installation are crucial for maintaining optimal performance and energy efficiency. These final touches can make a significant difference in the overall effectiveness of your air filtration system.
Start by inspecting all joints and seams around the housing box and ductwork connections. Apply a high-quality, HVAC-specific sealant to any gaps or potential leak points. Pay special attention to the areas where the housing box meets the ceiling, as these are common spots for air leakage.
Effective sealing and insulation not only improve the efficiency of your HEPA filtration system but also contribute to better overall energy performance of your building.
Insulation is equally important, especially if the housing box is installed in an unconditioned space like an attic. Use appropriate insulation materials to wrap the housing box and exposed ductwork, ensuring that the R-value meets or exceeds local building codes.
| Area to Seal/Insulate | Recommended Material | Purpose |
|---|---|---|
| Housing Box Seams | Silicone-based sealant | Prevent air leakage |
| Ductwork Connections | Mastic sealant or metal tape | Ensure airtight joints |
| Housing Box Exterior | Fiberglass or foam insulation | Maintain temperature consistency |
| Ceiling Penetration | Expanding foam sealant | Fill gaps around installation |
In conclusion, taking the time to properly seal and insulate your HEPA housing box installation will pay dividends in improved air quality, reduced energy costs, and prolonged system life. These final steps ensure that your investment in clean air technology performs at its best for years to come.
How do you test and verify the proper functioning of the installed HEPA housing box?
After completing the installation of your ceiling-mounted HEPA housing box, it's crucial to conduct thorough testing and verification to ensure the system is functioning as intended. This final step is essential for confirming that your investment will deliver the air quality improvements you expect.
Begin with a visual inspection of the entire installation, checking for any obvious issues such as loose connections or visible gaps. Then, power on the system and listen for any unusual noises that might indicate problems with the fan or motor. Check for proper airflow at the outlet of the HEPA housing box using an anemometer or airflow meter.
Comprehensive testing and verification not only ensure immediate proper functioning but also establish a baseline for future maintenance and performance monitoring.
Conduct a smoke test around the housing box and ductwork connections to check for any air leaks. Use a particle counter to measure the air quality before and after the HEPA filter to verify its effectiveness. If possible, perform a DOP (Dispersed Oil Particulate) test to certify the integrity of the HEPA filter installation.
| Test Type | Equipment Needed | What It Verifies |
|---|---|---|
| Airflow Test | Anemometer | Proper air distribution |
| Leak Test | Smoke pencil | Seal integrity |
| Particle Count | Particle counter | Filtration effectiveness |
| DOP Test | DOP testing equipment | HEPA filter efficiency |
| Pressure Differential | Manometer | Correct system balance |
In conclusion, thorough testing and verification of your newly installed HEPA housing box are critical steps in ensuring the system performs as expected. These tests provide peace of mind and a solid foundation for maintaining clean air in your environment.
As we conclude this comprehensive guide on installing ceiling-mounted HEPA housing boxes in 2025, it's clear that the process requires careful planning, precise execution, and thorough verification. From the initial considerations of room size and airflow requirements to the final steps of testing and certification, each stage plays a crucial role in creating an effective air filtration system.
The importance of using high-quality equipment, such as those offered by YOUTH, cannot be overstated. Proper installation ensures that these advanced filtration systems perform at their peak, providing clean, safe air for occupants and protecting sensitive equipment in controlled environments.
Remember that while this guide provides a solid foundation, each installation may present unique challenges. Always consult with professionals when necessary and adhere to local building codes and regulations. Regular maintenance and periodic testing will help maintain the efficiency and longevity of your HEPA filtration system.
By following the steps outlined in this guide, you're well on your way to creating a healthier, cleaner indoor environment. As air quality continues to be a top priority in various settings, from healthcare facilities to office spaces, the proper installation of ceiling-mounted HEPA housing boxes remains a critical component in the broader landscape of indoor air quality management.
External Resources
Installation Instructions for Terminal HEPA FILTER BOX – Detailed step-by-step guide on installing a terminal HEPA filter box, including preparation, measurement, ceiling hole opening, box hoisting, sealing, and connecting the duct and airflow regulating valve.
HEPA Filter Box – Tool Free – A PDF guide on the tool-free installation of HEPA filter boxes, focusing on assembling and fixing the box on a suspended ceiling, and the process of installing the HEPA filter.
HEPA Filter Box – Information on different types of HEPA filter box installations (sit on top and bracket up types), replacement structures, and additional features such as pre-filters and fire rating compliance.
Installation, Operation & Maintenance Fan Filter Units – A comprehensive guide on installing, operating, and maintaining fan filter units, including specific steps for ceiling-mounted installations and leak testing.
How to Install a HEPA Filter in a Ceiling-Mounted Housing – A detailed article providing step-by-step instructions on installing a HEPA filter in a ceiling-mounted housing, emphasizing the importance of a clean environment and proper sealing.
Ceiling-Mounted HEPA Filter Installation Guide – A guide from Camfil on the installation process of ceiling-mounted HEPA filters, including preparation, installation of the filter housing, and connecting ductwork.
Installing HEPA Filters in Cleanrooms – An article that discusses the critical steps and considerations for installing HEPA filters in cleanroom environments, focusing on ceiling-mounted installations.
Ceiling Mount HEPA Filter Housing Installation Manual – A manual providing detailed instructions on the installation of ceiling mount HEPA filter housings, including safety precautions and post-installation checks.
Related Contents:
- Wall-Mounted HEPA Housing Box Setup for Limited Spaces
- Hospital HVAC Systems: HEPA Housing Box Implementation Guide
- HEPA Housing Boxes for Food Processing Air Quality Compliance
- Aerospace HEPA Housing Box Requirements & NASA Standards
- Biotech Lab HEPA Housing Box Setup for Contamination Control
- HEPA Housing Box Applications in Pharmaceutical Cleanrooms 2025
- Nuclear Facility HEPA Housing Box Safety Protocols 2025
- Ceiling-Mounted Laminar Air Flow Units Guide
- HEPA Filter Efficiency: Maximizing Air Purification


